My Gmail inbox was once a chaotic mix of endless marketing emails, social media notifications, bills, receipts, and occasional important messages. It was overwhelming, time-consuming, and unproductive until I found the magic of Gmail rules. These helpers sort, filter, and organize my inbox on my desktop computer and Android phone. From automatically forwarding my bank statements to my accountant to categorizing Amazon receipts for effortless expense tracking, here are the top rules and filters that transformed my Gmail setup.
1:01

Related
How to create a Gmail alias (AKA alternate email address)
Organize your inbox by utilizing email aliases
Rules in Gmail: Explained
Before I share my custom Gmail rules, let me give you a quick overview. Rules are powerful filters that automatically sort, organize, and manage incoming emails based on set criteria. Think of them as your personal inbox assistant, working silently in the background to keep your messages tidy and efficient.
You can assign labels, archive, delete, forward, and mark the matching emails as important. The possibilities are endless. The key is identifying your pain points and automating repetitive tasks that drain your time and energy.
Auto-forward bank statements to an accountant
Dealing with statements and monthly bills from multiple bank accounts, credit cards, and a diverse investment portfolio can be daunting. Here’s where Gmail rules come into play. I created a filter that automatically forwards all such emails to my accountant.
When my bank statement or credit card bill arrives in the inbox, Gmail automatically identifies it based on the sender’s address (for example, from: Chase Bank or from: American Express) and forwards it to my accountant’s email address without lifting a finger. Here’s how to set it up:
- Go to your Gmail inbox and open an email you want to forward.
-
Click the overflow menu (the three dots) in the upper-right corner and select Filter messages like this.
- Gmail filters such messages in the background and opens a menu to set conditions.
-
Select Create filter.
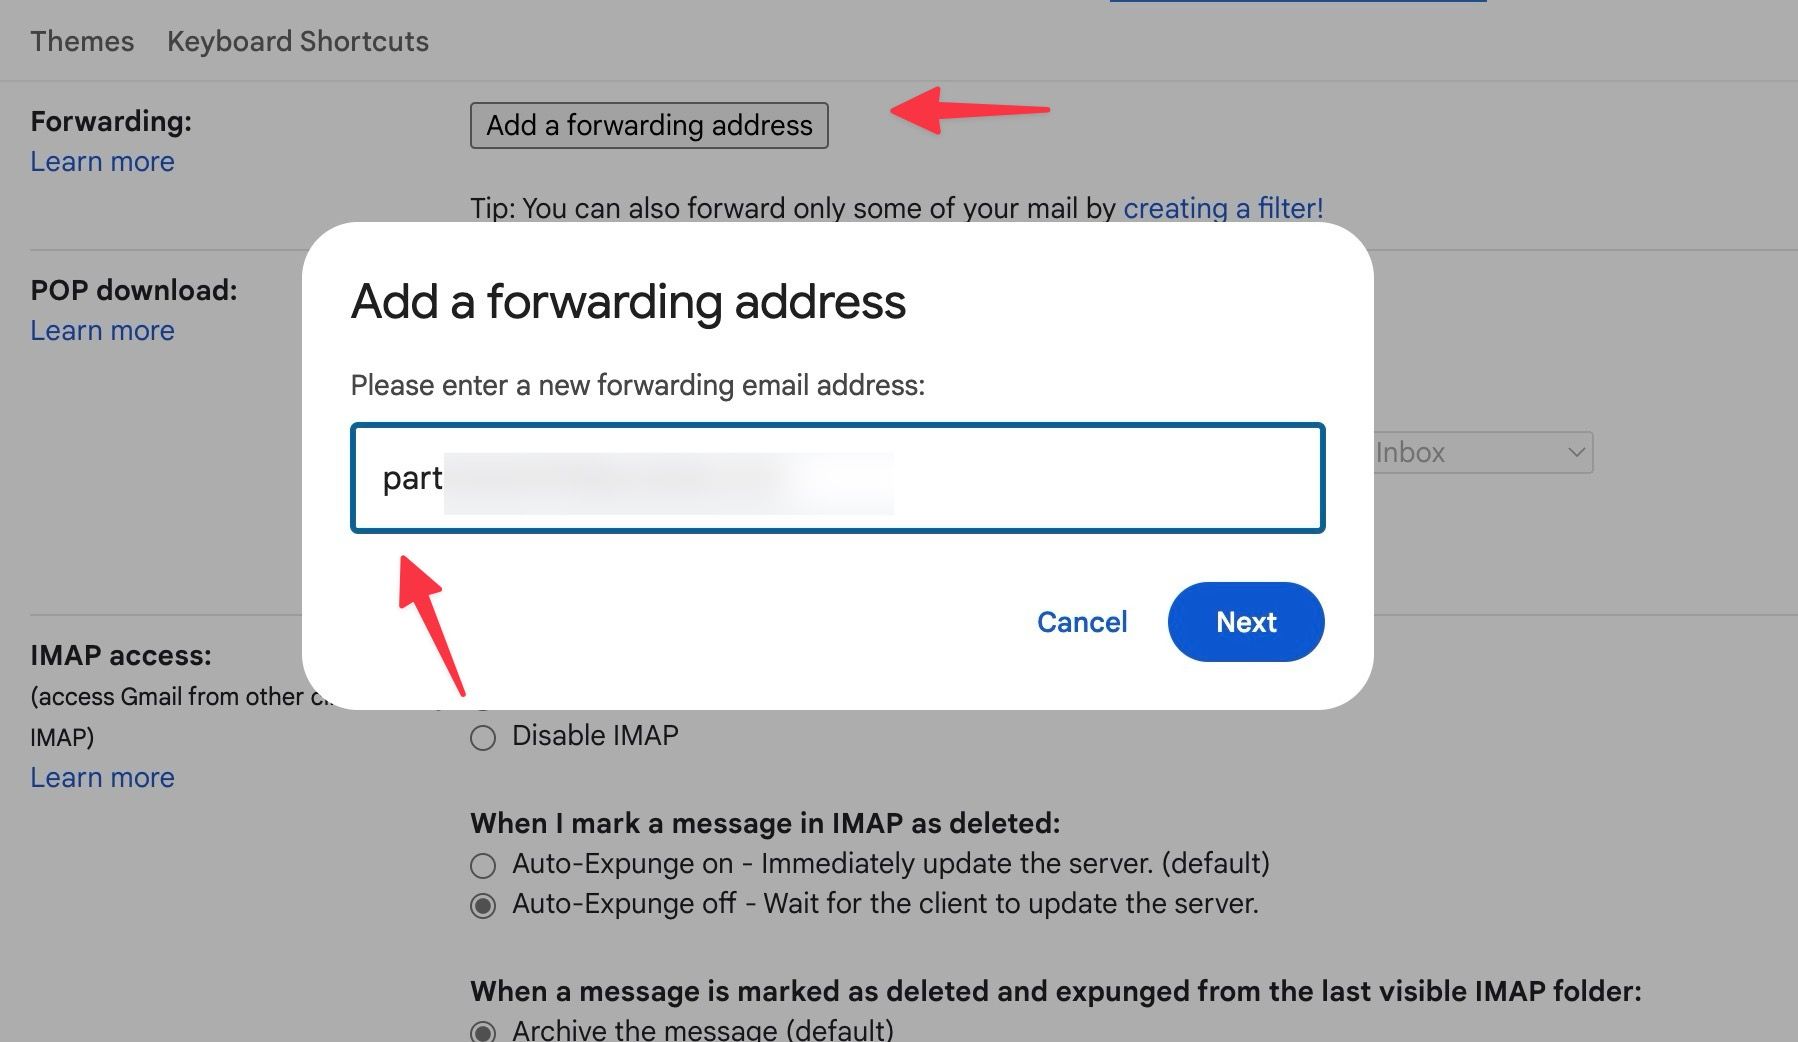
- Select Add forwarding address and add the recipient’s email ID from the following menu.
-
Follow the on-screen instructions to complete the setup. Gmail sends a confirmation email to the recipient’s email address. After the recipient confirms it, their email address appears in the Filters menu.
-
Click the checkmark beside Forward it to and select the email address.
- Select Create filter, and you’re good to go.
-
Gmail may ask for additional confirmation to verify your identity.
That’s it. You successfully created a filter where Gmail auto-forwards emails from specific senders to the recipient. Repeat these steps for similar emails from credit card companies, banks, and brokers.

Related
5 Gmail features Google desperately needs to fix
Gmail may be one of the best email services, but it could be better
Categorize Gmail messages with receipts
This is another neat filter I use to manage my Amazon receipts. I created a filter to apply a Receipts label to all such emails.
- Open a relevant email from Amazon and select the overflow menu in the upper-right corner.
- Click Filter messages like this.
- Add an email size.
-
Select Create filter.
- Click the checkmark beside Apply the label and choose a label from the drop-down menu.
-
Select Create filter and check the magic in action.
I use these filters while planning a summer vacation with friends and family. I apply a Holiday label to flight confirmations, hotel reservations, and car rental details to manage these emails effectively.
- Go to Gmail Settings.
- Select Filters and Blocked Addresses.
-
Select Create a new filter.
- Enter flight confirmation, hotel reservation as the Subject, and other travel-related words you want to filter automatically.
-
Click Create Filter.
- Select the checkmark beside Apply the label and pick Holiday.
-
Select Forward it to and enter the email addresses of other travelers.
- Select Create filter, and your rule is set in motion.

Related
10 reasons why Gmail is our go-to email client
Odds are you’re a Gmail user, but how much do you really know about the platform?
Other Gmail rules to consider
Here are other rules you can apply in your workflow.
- Create a filter to auto-delete promotional emails.
- Organize your job applications, interview requests, and recruiter emails under a Job Search label in Gmail.
- Manage online course confirmations, learning resources, and educational newsletters under a Learning label.
From chaos to control
Creating and applying Gmail rules doesn’t require rocket science. These examples share my playbook for managing my inbox chaos. I encourage you to experiment and set rules based on your unique needs.
Google is exploring Gemini integration in Gmail to manage your inbox using natural language. No more fiddling with complex filter settings. Check out our guide to learn more about how Gemini can transform your Gmail experience in no time.


GIPHY App Key not set. Please check settings